
I began this project two weeks ago and it was pretty touch and go. Each step seemed to bring about a fresh mishap, but when all was said and done it was worth the effort. Cole and I have owned this
Jennylund chair for about six years now. It has served us well in every apartment with its small size and survived most of our moves fairly well. As much as I liked the chair, I was bored with its style and limited slipcover options. Since I had already hacked an Ikea Karlstad chair (more next week), I figured I could attempt another. The only hitch this time around was that my first hack had lots of internet diy's to reference, but there wasn't a bit of info out there for what I wanted to attempt on the Jennylund. So I planned it out as best I could, crossed my fingers, and went for it.

Before-During-After:
The progression of the chair started with the old stained white slipcover, the first failed dye job and the finished project. Seeing all three photos lined up, the results are quite dramatic. I can hardly believe it's the same chair.

Inspiration:
My vintage rug was the color guide for the chair. I wanted something between the golden yellow and burnt orange shades found in the rug. I also wanted a shade that would contrast nicely with all the grey tones in the living room.

Dye #1:
The first dye job looked something like the above and turned out bad. I decided to use my porcelain bath tub and I do not recommend this for anyone with a non-porcelain tub. Also, if your tub, like mine, needs refinishing you'll be left with faint pee stains that are a biznitch to get out. Soft scrub helped.

Dye #2:
Using liquid dye is sooooo much easier. I used half of the cocoa brown and got exactly the shade I was hoping for. The tub now had brown poo-ish stains. More soft scrub to the rescue.

Upholstering the Chair:
-To wrap the skirt under the chair, Cole pulled the fabric tight and stapled it in place.
-Due to all the hot dying and washing, the slipcover had shrunk. I had to cut above the zipper to get the slipcover back on. I then created a patch with extra fabric cut from the skirt to cover the exposed area (not pictured).
-The old block legs were unscrewed and new brackets where screwed in place.
-I replaced the seat cushion with a pillow insert I found at JoAnn's on sale. The old cushion was just too hard and uncomfortable. The cushion is now very comfy but might need a thin layer of firmer foam on the bottom to create a more structured cushion.

Button Tufting:
Here's a quick guide on how I accomplished button tufting for the chair. I used pieces of masking tape with dots in the center to help gauge where I wanted to place the buttons. Once I had the mock spots in place I measured and measured again till I was happy.
-In the top left photo I marked the bottom and middle of the area I was using for tufting, then used those measurements as guides to ensure that the button placement was even and centered (top right photo).
-The middle two photos are of the back of the chair. Button tufting was a bit more complicated than normal since I had to some how puncture the wood backing of the chair without ruining the fabric. Cole first tried drilling through which created a mess since the stuffing surrounding the wood backing wound around the drill bit. Plus the first hole on the back (the one without tape) was not lined up with the front. Cole next tried hammering a nail through the wood (to create the necessary hole for the needle to pass through), which ended up working. In order to anchor the front buttons I had to use small buttons on the back.
-In the bottom two photos, I bought 1 1/8 buttons from JoAnn Fabrics and used excess fabric from the chair skirt to cover the buttons. On a random side note, I happened upon tights at Target that matched my dyed fabric!
-To learn how to button tuft, I recommend searching youtube. My favorite is this quick
video.

The Final Step:
-The taper legs and brackets were bought from
Do It Best hardware.
-I stained the legs with minwax Early American.


Whew. Check back next week for Hack No.2!!
xxMaria


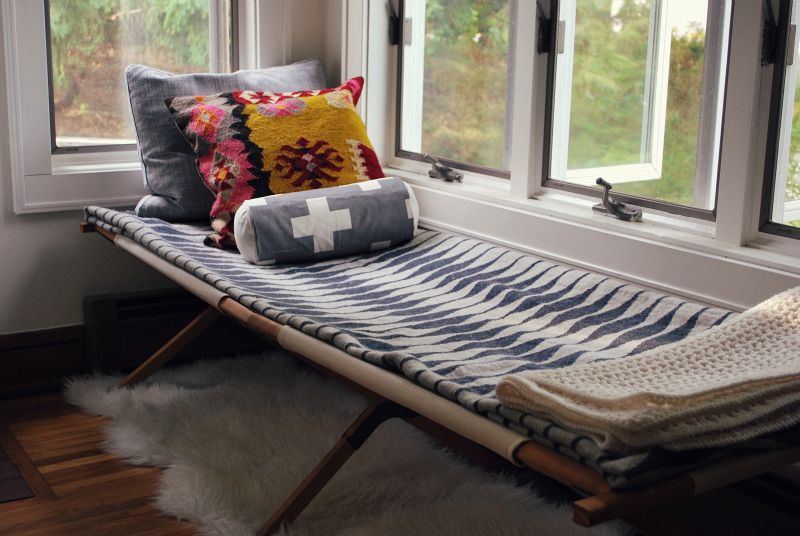 Whew, sorry for no post last week. My parents were in town visiting and I didn't want to lose a minute with them. Living in different states means it's pretty rare that we get to see each other. Le sigh. Here's a diy that I've been dying to share ever since I bought the cot back in June! After trolling craigslist and having no luck, I eventually found this amazing vintage army cot on ebay for a reasonable price. The cot arrived in fairly good condition with some discoloration and stains on the canvas but otherwise was in good working order. The cot was immediately placed under the windows in my living room- I knew before I bought it that I wanted something narrow and comfy but rustic to use as a window seat/daybed- and put to use. It lasted for about two weeks before the canvas gave way and ripped. Worry ensued...would I be able to find a replacement, if not, what will I put under the windows!?! After a few heated moments of google searching I found


