Tuesday, August 28, 2012

DIY: Vintage Army Cot

DIY: Vintage Army Cot
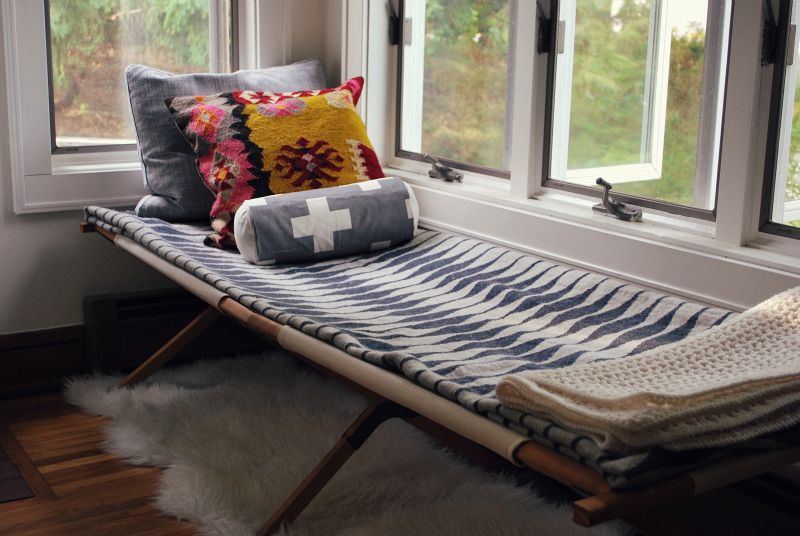
DIY: Vintage Army Cot Whew, sorry for no post last week. My parents were in town visiting and I didn't want to lose a minute with them. Living in different states means it's pretty rare that we get to see each other. Le sigh. Here's a diy that I've been dying to share ever since I bought the cot back in June! After trolling craigslist and having no luck, I eventually found this amazing vintage army cot on ebay for a reasonable price. The cot arrived in fairly good condition with some discoloration and stains on the canvas but otherwise was in good working order. The cot was immediately placed under the windows in my living room- I knew before I bought it that I wanted something narrow and comfy but rustic to use as a window seat/daybed- and put to use. It lasted for about two weeks before the canvas gave way and ripped. Worry ensued...would I be able to find a replacement, if not, what will I put under the windows!?! After a few heated moments of google searching I found Hoggan's that sells canvas cot replacements! The custom canvas took a few weeks to arrive but then came the fun (read: not so fun for Cole) task of removing and replacing.
DIY: Vintage Army Cot
Before-old stained and ripped canvas; After-fresh and new
DIY: Vintage Army Cot
The hardest part was removing the old cover. Cole has strong hands!
DIY: Vintage Army Cot
Cole tried removing the old staples but it was too tricky, so we just stapled the new cover over it along with the original cot instructions.
DIY: Vintage Army Cot
The finished underside. I then trimmed up the excess fabric.
DIY: Vintage Army Cot
Our living room is now 3/4 of the way done!!

Things of note:
-Vintage cots are pretty creaky and unstable. Not recommended for those who don't enjoy the thrill of feeling as though it might collapse every time you sit down (this hasn't happened yet).
-You want your new canvas to be very taught when stapled on since it will stretch a bit with time.

xxMaria

Thursday, August 16, 2012

DIY: Faux Bois Refrigerator Makeover

Oh what a week. Last Friday, I decided to both contact paper the fridge and finish painting/stenciling my kitchen floor. What a mess! One of the things you'll discover about me is that I tend to jump in head first with projects. I do a bit of planning but overlook the minor nitty-gritty details. Why I do these things to myself I have no clue, but my mother always said I was a glutton for punishment. ;)
Before & After: Refrigerator Makeover
This DIY idea came to me via Elizabeth at Delightfully Tacky (check out her post for more detailed instructions). I recalled reading it two years ago and decided I was sick of having the same boring fridge in every place I lived. It was time for a little makeover. Before I began cutting, I removed the handle (which I decided not to replace afterwards) and I measured every piece allowing for a two inch wiggle room for wrapping around the top and sides to create a flush look. Luckily Cole was on hand to encourage me to actually match the wood grain and paper the top. I hesitated at first- would it even be noticeable, plus the added waste of cutting off paper in order to match, and if I can't see the top of the fridge, who cares. Cole reminded me that just because I'm only 5'4.5" (that half inch is very important) doesn't mean the rest of the world isn't taller. Bah. So match the grain and paper the top, I did, and I will *grudgingly* admit that it looks pretty darn good. Before & After: Refrigerator Makeover
Before & After: Refrigerator Makeover

Things of note:
-If you're planing on matching wood grain buy two rolls of contact paper for the two sides (if you're doing all three sides and the top you'll probably want three rolls).
- I didn't feel it was necessary to match the grain on the top and used the larger scrap pieces.
-When using multiple rolls, be sure to use the same roll for the same section of fridge since each roll has a different pattern and slight color variation i.e. the doors for one roll and the side for another.
-The contact paper can be easily nicked and/or scratched! This happened on a small spot and I patched the nick with a matching piece and you can hardly notice.
-The contact paper can be repositioned multiple times but is tricky to trim once in place.
***Remember, it's not going to be perfect, but it's a nice temporary fix until you can afford the refrigerator of your dreams!

xxMaria
Follow my blog with Bloglovin

Thursday, August 9, 2012

Part 2: What we've been up to

I can't thank everyone enough for the incredible welcome back!! All your wonderful comments have made the decision to start a new blog feel even more right. Here's the final installment of my instagram photos getting you all caught up. From here on out, I plan on posting one to two times a week especially while I'm still in the middle of unpacking. Also, next week will be the start of more in depth project posts.

We bought a house!
-front door painted geranium red and vintage knocker installed; -farmers market flowers
We bought a house!
-first wood countertop in place; -made a batch of wood spoon oil for the countertops 
We bought a house!
-vintage spice tins turned refrigerator magnets; -new kitchen rug and Pendleton hat
We bought a house!
-enjoying a lazy day; -hydrangeas from my backyard
We bought a house!
-wearing something other than paint scrubs; -unpacking books and finding old favorites
We bought a house!
-succulents; -incense smokehouse
We bought a house!
-back to french braiding my hair; -original door knobs
We bought a house!
-homemade strawberry jam from the man that refinished our floors; -I splurged at the Privet House at Target sale
We bought a house!
-completed tufting on karlstad chair; -almost done kitchen with new countertops, sink, faucet, and walls
We bought a house!
-date night with Cole; -reclaimed and recovered vintage army cot
See you next week!

xxMaria

Wednesday, August 8, 2012

Part 1: What we've been up to

Since my lovely dslr was neglected during most of the move, the best way to sum up the past three+ months is with instagram photos. Fear not! I will be going into greater detail with diy and before/after posts, but for now here's part 1 of  "what we've been up to" starting at the beginning...
We bought a house!
-April 27, 2012 closing day in my new back yard; -our first project of removing carpet in the den
We bought a house!
-Wellie and Pip love all the room for running; -we had the hardwood floors refinished on the whole first floor
We bought a house!
-sunset at the beach across the street; -moving day (most of those boxes are my shoes!)
We bought a house!
-final trip to my parents' cottage before they sold and where we celebrated my 31st b-day
We bought a house!
-lots of boat rides to say goodbye to Torch Lake; -quality time spent with my nephew
We bought a house!
-one of my new neighbors brought us peonies from her garden; -Pip & Wellie get comfy in the wrong positions
We bought a house!
-I painted the bathroom tiles white and added a vintage wine rack; -I painted the fireplace white, too
We bought a house!
-switched out Ikea block legs for tapers on our karlstad chair; -making buttons for said chair
We bought a house!
-found this gorgeous mid century mirror on craigslist for $30 (plus a peek of my dining room); -first part of button tufting done
We bought a house!
-baby's breath; -Pip is Wellie's headrest

Check back tomorrow for part 2!

xxMaria

We bought a house!

We bought a house!

After years of building our imaginary "house of dreams" and making the most out of rentals, my husband Cole and I have made our dreams a reality. It was a short lived house hunt, with only five houses viewed, but we knew the minute we saw this charming little bungalow that this was our house. Situated in a little town northeast of St. Paul, across the street from a lake and beach, and with a top ranking school district to boot, there was little not to love about this 1927 fixer-upper. We closed at the end of April and have been busy ever since packing and unpacking, painting and repainting, along with building and tearing down. I knew buying a house was exhausting, I just never realized it would be the tired-all-the-way-down-to-my-bones kind of exhaustion. That said, the past three+ months have been quite wonderful with already a few completed projects and many more waiting in the wings.

This blog will be my space to share our finished projects, helpful diy's, fun adventures and even a few outfit posts thrown in the mix. Basically, it'll be a lifestyle blog that I hope both my new and old readers will enjoy.

Check back later for part 1 of what we've been up to!

xxMaria